How to Update BIOS on Windows 10 [Check Version & Upgrade]
Find out everything about flashing your BIOS
- If you're not changing your hardware and you don't have any specific errors, it's not necessary to update the BIOS.
- The BIOS comes pre-installed on the motherboard so in this guide you will learn how to update the motherboard BIOS.
- Updating the BIOS is a tricky operation and you should start by checking the BIOS version and gathering information.
- You can update BIOS in Windows 10 from the BIOS itself as indicated in our solutions below.

BIOS is a crucial component of every PC that allows you to change your hardware settings without starting Windows.
Your BIOS has many features available, but some advanced users tend to update theirs in order to get access to new features.
Updating BIOS can be a somewhat complicated procedure, so today we’re going to show you how to flash your BIOS on Windows 10.
How do I update my BIOS in Windows 10? The easiest way to update your BIOS is directly from its settings. Before you start the process, check your BIOS version and the model of your motherboard.
Another way to update it is to create a DOS USB drive or use a Windows-based program. If you want to know how to do that, check the steps below.
How can I flash the BIOS on Windows 10?
- Do I need to update my BIOS for Windows 10?
- How do I check my BIOS version?
- Update BIOS through Windows
- Create a DOS USB drive
- Use Windows-based programs
- Can I perform a BIOS update on Windows 10 without a battery?
1. Do I need to update my BIOS for Windows 10?

Flashing your BIOS is an advanced procedure, and if you don’t perform it properly you can cause major damage to your PC.
The main problem with BIOS is that it’s located on a chip on your motherboard, and if the update process goes wrong, you won’t be able to start Windows at all.
In most cases, you don’t even have to update your BIOS unless there’s a major problem with your hardware.
How do I know if my BIOS needs updating? If you have a hardware problem and the only way to fix it is to update BIOS, then you might have to update it.
To perform a BIOS update successfully, you need to be sure that the update process isn’t interrupted by a power loss or unexpected shutdown.
If that happens, the BIOS update process will fail, and you’ll most likely cause damage to your motherboard.
To prevent any problems, be sure to connect your laptop directly to the power outlet or use a UPS for your desktop PC.
Although updating the BIOS can be potentially dangerous, there are certain benefits after updating it. Sometimes, the BIOS update brings support for new hardware, such as support for new CPUs.
Another benefit of BIOS updates is improved stability and potentially new features such as overclocking.
2. How do I check my BIOS version?

Before you update your BIOS, you need to find out which version are you currently using. The easiest way to do that is to use Command Prompt or System Information tool.
Here are more ways to check the BIOS version on Windows 10
- Use Command Prompt
- Use System Information tool
- Try the Registry Editor
- Use DXDiag
- Use PowerShell
We already covered each method extensively, so make sure you take a look at our full guide on how to check your BIOS version on Windows 10.
In addition to the BIOS version, you also need to know the model of your motherboard. If you don’t have the data readily available you can use our guide to check your motherboard model.
You can see the model of your motherboard by using any hardware information tool such as Speccy or CPU-Z. Here’s a full list of tools to check your system configuration.
- After finding the version of BIOS that you’re using, you need to download the new version from your motherboard manufacturer’s website.
- Go to the Support or Download section and select your motherboard model. Be sure to download the BIOS update for the exact model of the motherboard that you’re using.
- When you download a new version of BIOS, it will be stored in an archive so you’ll need to extract it first.
- After that, check the available readme file for instructions and any additional information.
 NOTE
NOTE
Almost all versions of BIOS have update notes available on the download page so you can easily see what issues the update fix.
3. Update BIOS through Windows
1. Download the newest BIOS version from your motherboard manufacturer’s website and copy it onto an USB flash drive.
2. Open the Start Menu and click the Power button.
3. Hold the Shift key and choose the Restart option.
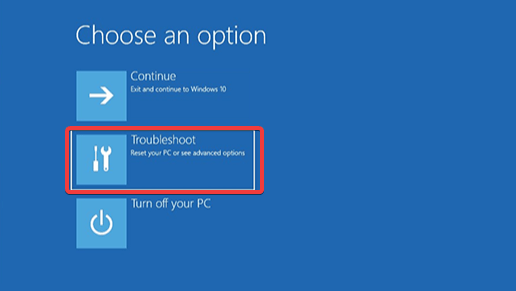
4. You should see several options available. Choose Troubleshoot.
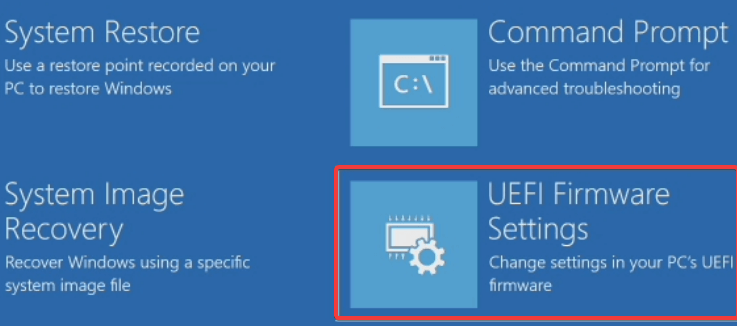
5. Now select Advanced options and select UEFI Firmware Settings.
6. Click the Restart button and your computer should now boot to BIOS.
7. Once you enter BIOS, look for BIOS update option and select it.
8. Now you need to choose the BIOS update file from your USB flash drive and wait while your BIOS updates.
Some motherboard manufacturers allow you to flash your Windows 10 BIOS simply by accessing it and choosing the update option.
Expert tip:
SPONSORED
Some PC issues are hard to tackle, especially when it comes to missing or corrupted system files and repositories of your Windows.
Be sure to use a dedicated tool, such as Fortect, which will scan and replace your broken files with their fresh versions from its repository.
This is relatively simple and in order to do that you need to move the downloaded BIOS update to a USB flash drive. Manufacturers offer tools that will create a USB flash drive with all the necessary files, so you won’t have to transfer them manually.
Before moving the update to the USB drive, be sure that there aren’t any other files available on the drive.
You can access BIOS during the boot sequence by pressing the appropriate key. In most cases that’s Del or some other F key, so keep an eye for a message that tells you to press a certain key to enter SETUP.
In addition, you can always check your motherboard manual to see which key you need to press in order to access BIOS.
Keep in mind that the update process is a bit different for each motherboard model, so be sure to check the instruction manual for details on how to update your BIOS.
4. Create a DOS USB drive
This DOS solution is an older method of flashing BIOS and is probably the most complicated. This process requires you to create a bootable USB flash drive and to copy the new version of BIOS to the drive as well.
In addition, you’ll need a script that will flash the BIOS. This file will usually be available in the archive with your BIOS update, and it will have .exe or .bat extension.
In some cases, this script will have to be downloaded separately. To create a bootable USB drive with a DOS system, you need to use third-party tools such as Rufus.
Simply format the drive using this tool and be sure to check the Create a bootable disk using the FreeDOS option.
After doing that, transfer the BIOS update file and an installation script to the USB drive and restart your PC. Boot your PC from the USB drive and run the setup script using DOS.
This is an advanced procedure, so we highly recommend that you check your motherboard manual for detailed instructions on how to do that.
5. Use Windows-based programs
If using DOS seems too complicated for you, you might want to consider using a Windows-based application in order to update Windows 10’s BIOS.
Many motherboard manufacturers have BIOS update applications available that allow you to update BIOS by using a simple graphic interface.
Although this is the simplest way to do it, there are certain issues with it. Installed software can sometimes interfere with this process and cause BIOS updates to fail.
Security programs can often interfere with BIOS update process and cause all sorts of problems to appear, so it might be best that you disable them completely while flashing your BIOS.
Any system crash or freeze could also affect the update process, so it might be better that you use some different method to update BIOS.
Motherboard manufacturers will often recommend the best method to update your BIOS, so be sure to use that method.
Updating BIOS isn’t a hard process, but it might be potentially dangerous, so be cautious if you decide to update your BIOS.
In addition, be sure to double-check everything before starting. Many BIOS update tools will give you the option to save or back up your current BIOS, so be sure to use this feature.
It’s not necessary that you update your BIOS, especially because you can cause irreversible damage to your motherboard if you don’t do it properly.
However, if you’re having a hardware issue and the only solution is to update your BIOS, be sure to carefully read your motherboard’s instruction manual to see how to update your BIOS properly.
Some computer manufacturers like Asus, Dell, or Lenovo offer a built-in tool to update your BIOS. You can always check your PC’s manual to see if it offers such a tool to make things a little bit easier.
6. Can I perform a BIOS update on Windows 10 without a battery?
Sometimes, you might find yourself in a situation where your laptop battery is not charging. Performing a BIOS update can help you recover a stubborn battery that refuses to charge. But there is a catch.
As you probably know, updating your BIOS requires an AC adapter plugged in or at least 10% of battery autonomy. So how to break this loop and force the Windows 10 BIOS to update?
Here’s how to bypass the BIOS battery requirements:
Download the latest BIOS update file from your manufacturer’s home page and store it at hand.
- Next, open the CMD with administrative privileges. (Don’t worry if it does not work from the first attempt, we will show you what to do if you can’t run Command Prompt as admin).

- Enable UAC if prompted.
- Once you reached the root directory in the C:\Windows\system32> area, type the following:
biosfilename.exe/forceit - Note that you must replace the biosfilename value with the exact name of the file you previously downloaded from the manufacturer’s site.
- Press Enter and proceed with the reboot in order to complete the BIOS flashing.

Not sure how to access BIOS in Windows 10? Don’t worry, we will guide you from the very beginning.
If you have any more questions or concerns with the Windows 10 BIOS update process, don’t hesitate to leave them in the comments section below.
Still experiencing issues?
SPONSORED
If the above suggestions have not solved your problem, your computer may experience more severe Windows troubles. We suggest choosing an all-in-one solution like Fortect to fix problems efficiently. After installation, just click the View&Fix button and then press Start Repair.