How to Manually Install Drivers on Windows 11 [3 Ways]
Discover tried-and-true strategies vetted by our team of specialists
- Keeping your software components working properly is mandatory, so consider automatically and manually installing drivers on Windows 11.
- Using the new and improved Settings menu is the first option you should try.
- To manually install drivers on Windows 11, you can also access the device manufacturer's official website.
We can strongly admit that without drivers, our PC and OS won’t run in normal conditions. Before anything else, you should know that you can both automatically and manually install drivers on Windows 11.
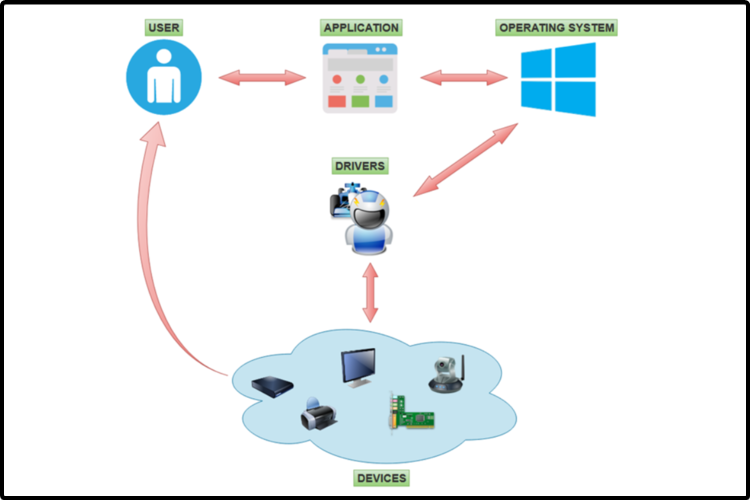
A device driver is able to simplify programming, acting as a translator and communicator between your device and the apps or OS that use it.
Drivers are important considering that if they are not working properly, you might notice malfunctioning or unresponsive hardware. Even more, they hide the intrinsics of your hardware devices, allowing you to use an extremely easy interface.
In the picture below you can view how drivers work on your PC. As you can see, drivers are software components related to your device, that allow your OS to start, use and control all the hardware and software pieces.
It seems like some users need to know how to manually install drivers on Windows 11, and we’re going to show you the easiest ways you can do it.
In order to discover the most proper option, make sure you try all the listed ones below.
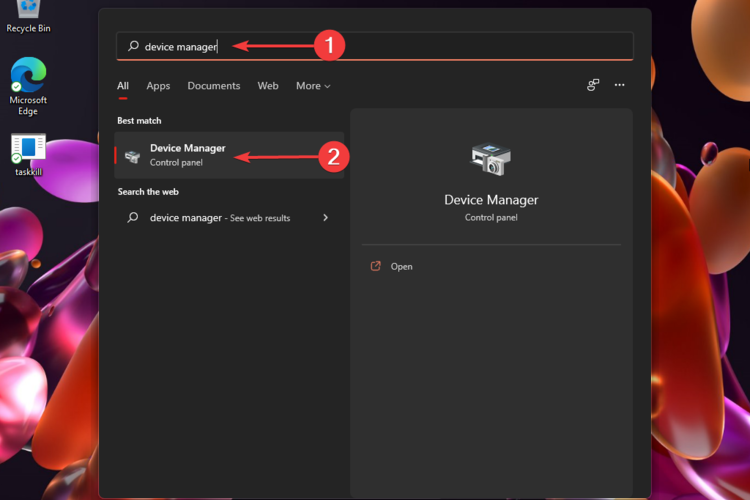
How can I manually install drivers on Windows 11?
1. Use the Settings menu
An efficient and incredibly practical way to manually install drivers on Windows 11 is with the Settings menu, namely using the Windows Update tool from your computer.
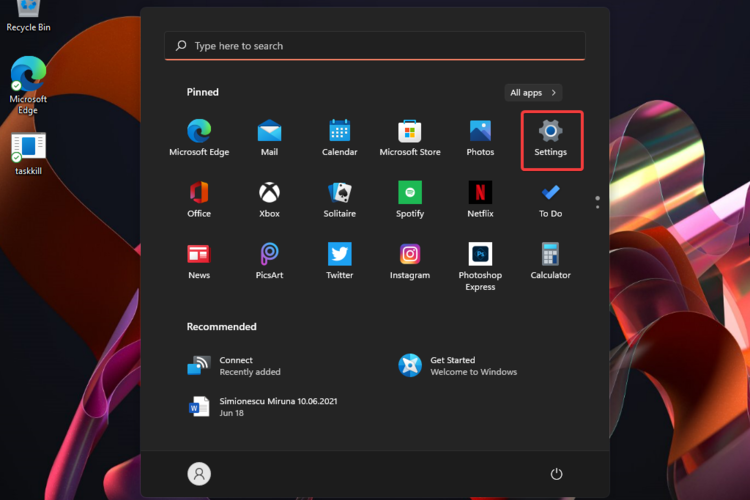
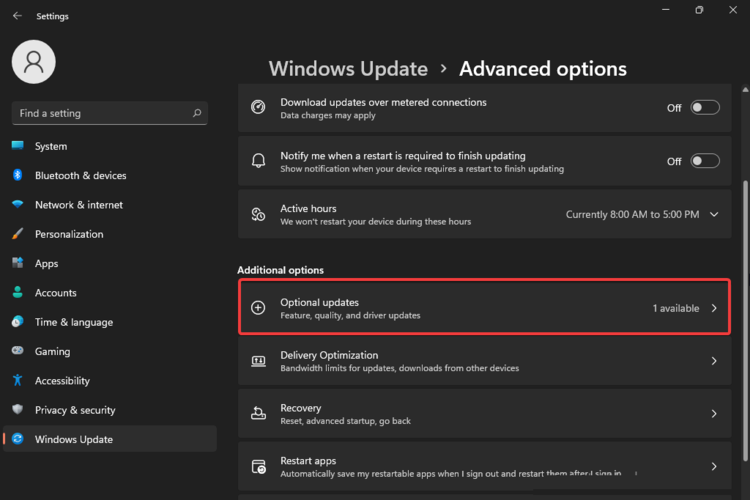
1. Open Settings.
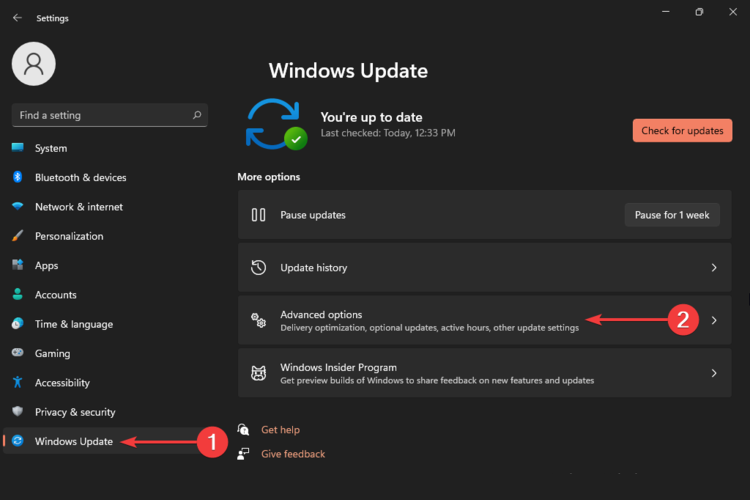
2. Go to Windows Update, then select Advanced options.
3. Select Optional updates.
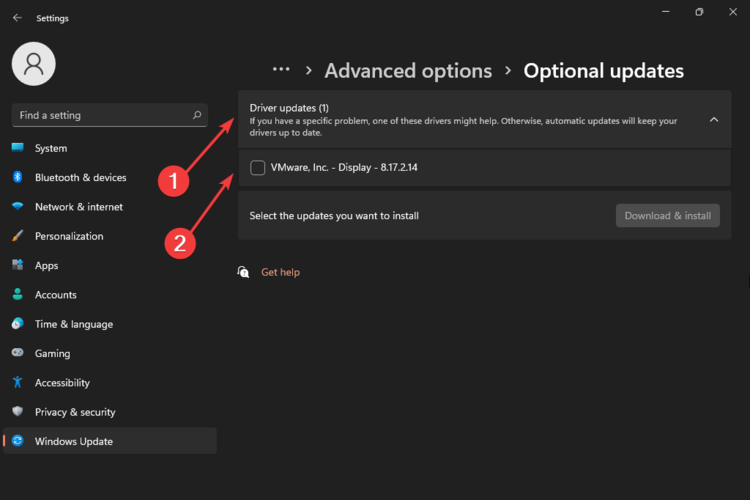
4. Expand the Driver updates section, then checkmark the recommended drivers.
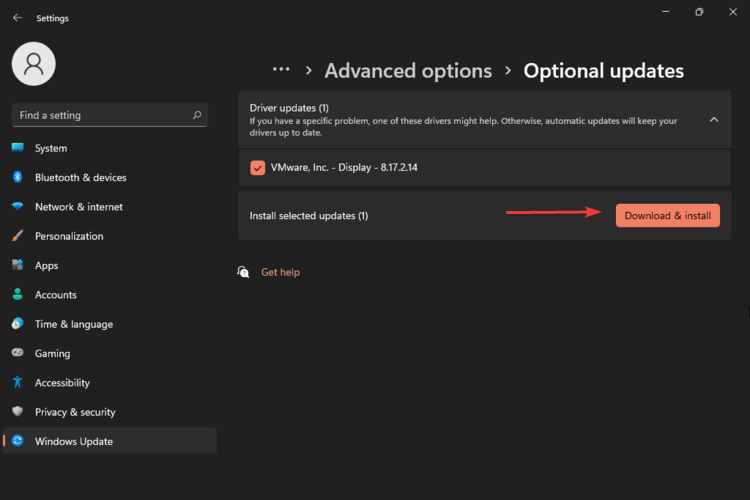
5. Click on the Download and Install button.
6. Wait for the process of installing drivers to finish.
2. Get drivers on Windows 11 from the manufacturer’s website
- Open any web browser, then search for your driver manufacturer’s driver download center.
- In most cases, you should search for the exact model of your product, but you can also look for the general driver.
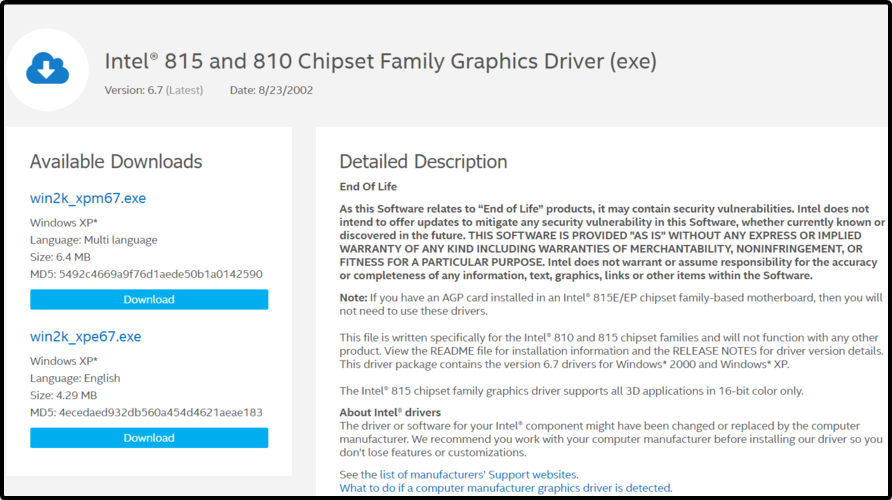
- So let’s say you access the Intel download center. In the search bar, you can type your needed specifications, as in the example below:

- A list will appear, then you’ll have to select one of the available drivers (We recommend choosing the latest ones).
- Click on the Download button.

- Follow the on-screen instructions to install it.

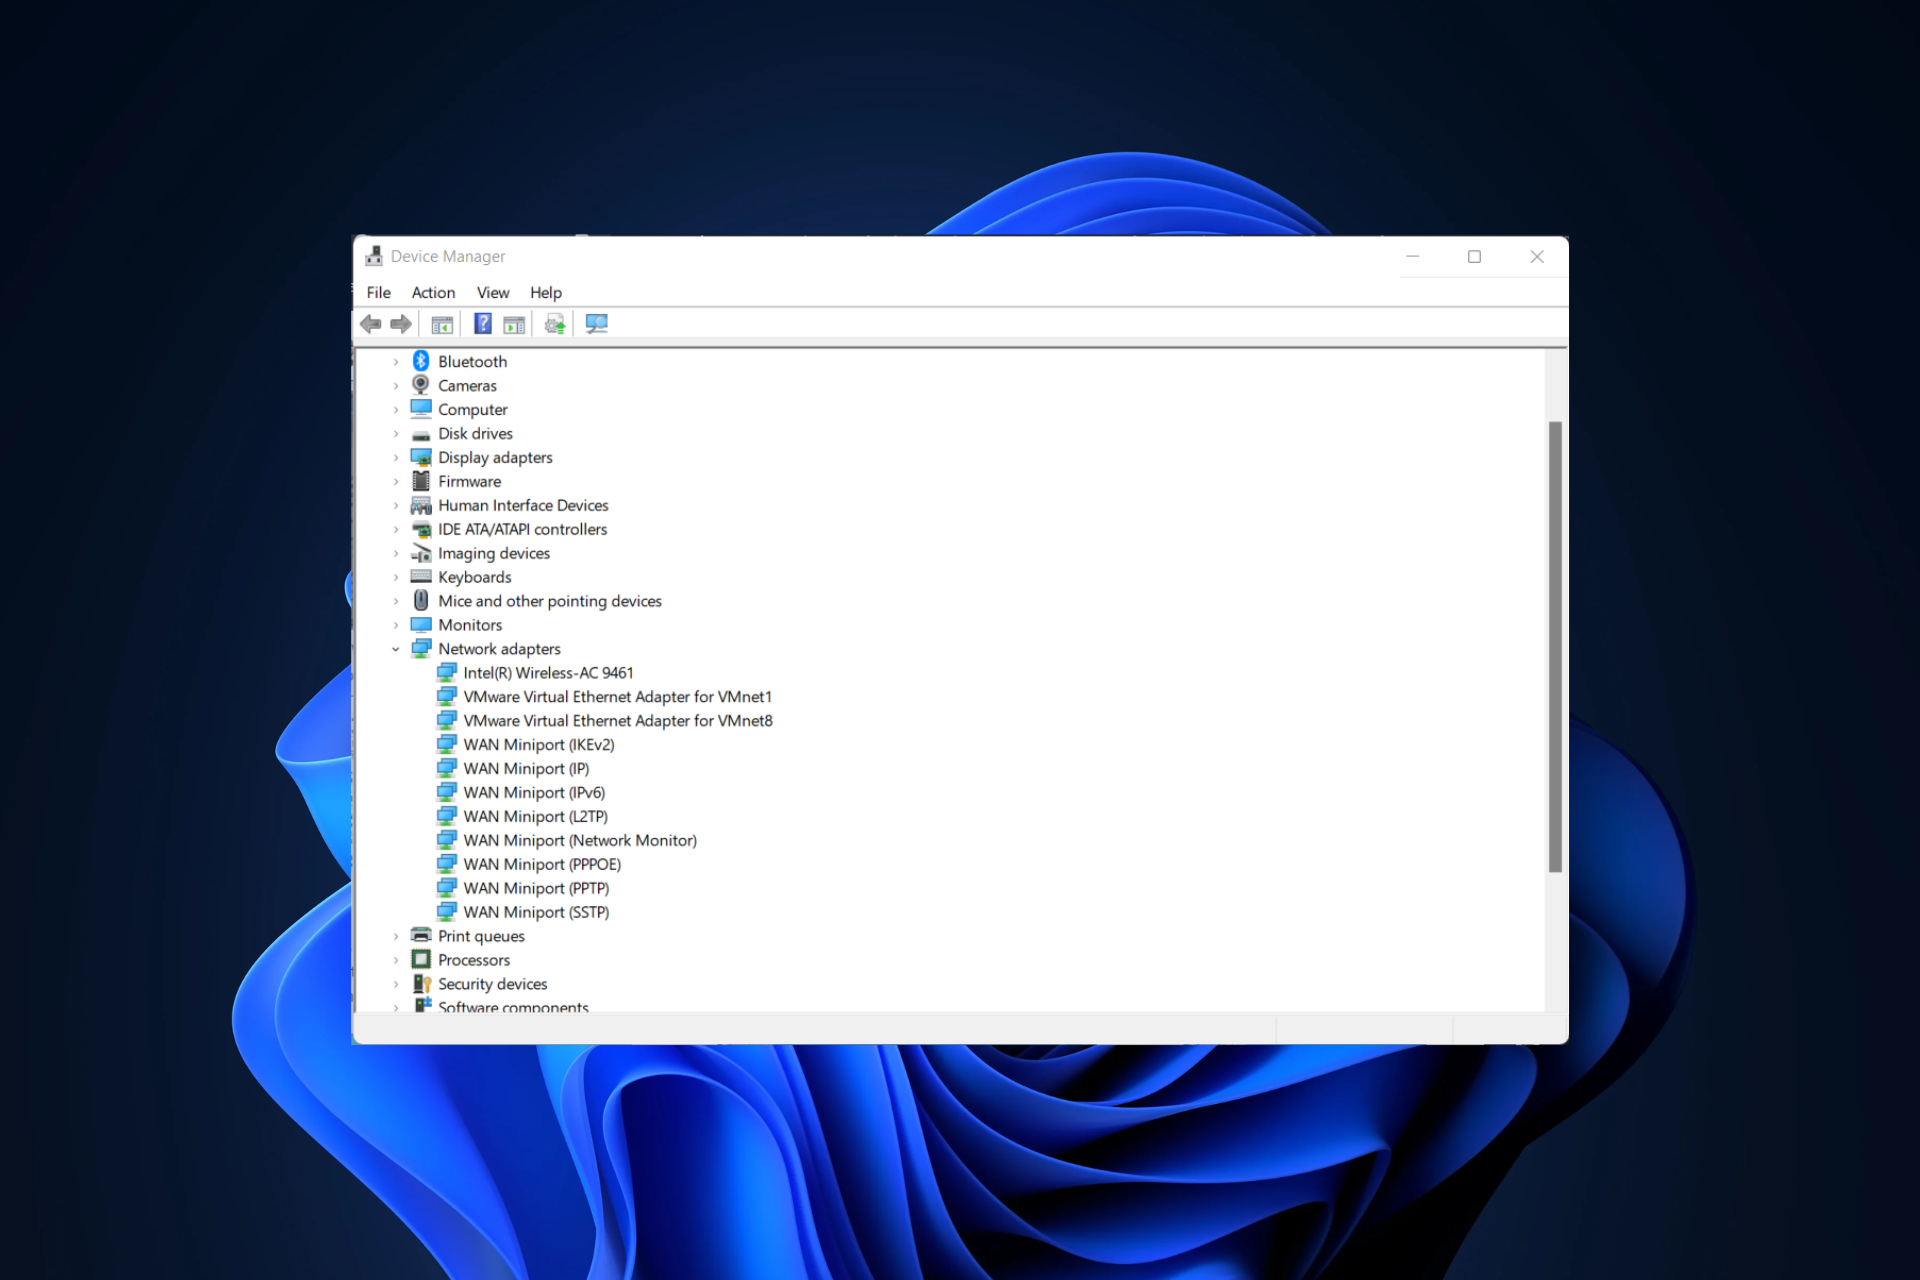
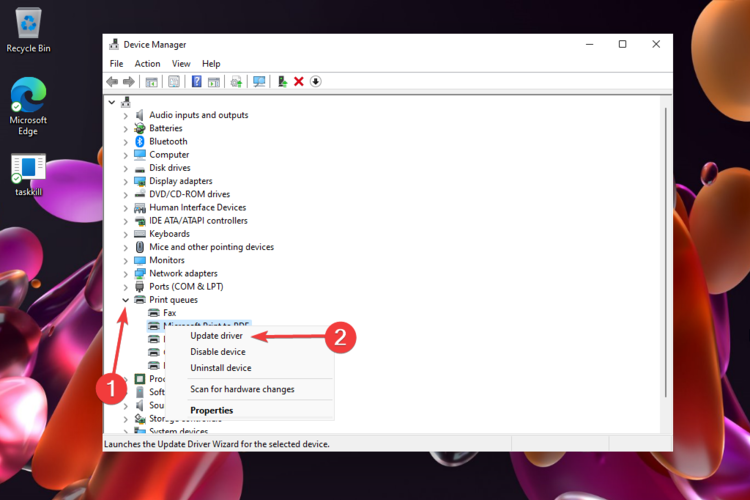
3. Use Device Manager
- Open Device Manager.

- Expand the related-driver section, then right-click on the needed driver, and select Update driver.
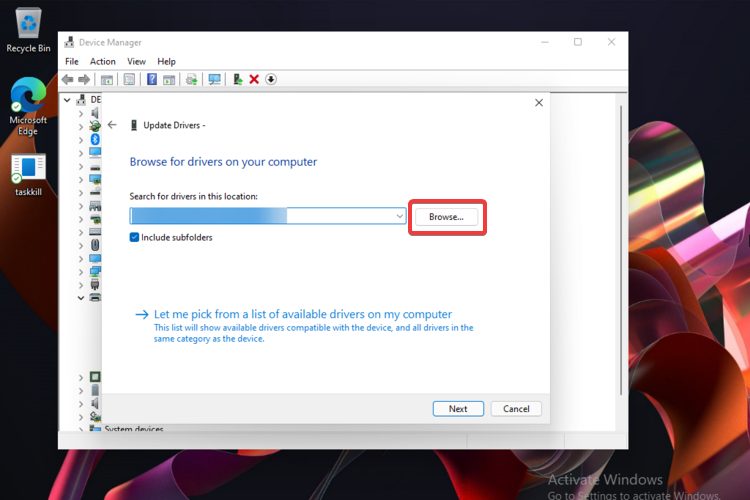
- Choose Browse my computer for drivers.
- Click on the Browse button, then select a location for your driver.
- Click on the Next button.


What are the most common driver problems?
Expert tip:
SPONSORED
Outdated drivers are the main reason for errors & system issues. If some of your drivers are missing or needs updating, an automated tool like OutByte Driver Updater can solve these problems in just a couple of clicks. Plus, it's also lightweight on your system!
To prevent any issue related to your drivers, we prepared a list of the most common driver problems. Also, make sure we’ll come up soon with full-fix articles regarding these problems in Windows 11.
- BSOD errors, also known as the Blue Screen of Death errors
- Computer screen freezing issues
- Printer or scanner not responding properly
- Mouse, touchpad or touchscreen driver related issues
- Sound and audio driver issues
- USB or keyboard driver problems

To prevent all of these troubles, we recommend constantly updating your drivers. It’s possible that you’ll feel overwhelmed if you have to update each driver manually whenever it’s needed.
When there are issues with hardware, peripherals, or software performance, having your drivers up and running is a must-do operation.
As for automatic scans of missing or outdated drivers, we can only encourage you to use a dedicated tool such as Outbyte Driver Updater.
However, an automated solution like Outbyte Driver Updater not only downloads and installs drivers, but also manages them by troubleshooting, backing up, and restoring them.
You may rely on Outbyte Driver Updater to make such changes to ensure a proper installation and upgrade with the most latest and compatible Windows 11 drivers.
How often should I check for updated drivers?
In general terms, you don’t have to manually check for your updated drivers, and that’s because Windows will let you know if there’s a new one available for update.
However, like any other software component, it is possible that it won’t always notice you when if there’s such an available actualization. Thus, you may need to manually check for updated drivers.
If you wonder how often should you inspect for this kind of action, take a look at the information listed below:
- Before anything else, consider checking for driver updates after every large Windows update.
- You need to examine the driver updates every time you install a new app on your PC.
- Considering the GPU drivers (graphic processing unit), you can update them every time a new game or video editing program comes up.
- If you need to connect any peripherals to your device (such as USB cable, printers or scanners), you should check for the related drivers as soon as you associate them to your computer. Thus, you’ll make sure that they won’t harm your PC.
Having an optimized driver requires every three-month update. In addition, consider that you can also access the Microsoft Download Center, and search for the driver you need to install.
So these are the easiest methods that will help to manually install drivers on Windows 11. Of course, you can also do it in an automatic manner, which is a less time-consuming option.
If you have any other questions regarding this subject, do not hesitate to comment in the section below.